--For the inserts it is best to use soft, absorbent fabric like flannel.
--The envelopes work best made with a stiffer fabric, like broadcloth.
--When choosing your fabric, try to go with COLORful fabric, as many African women are intimidated with white.
--The finished size is 10 inches long (3.5 inches wide across the ‘pocket’) and 8 inches wide (the flaps that snap are 2 inches).
Pads
1. Cut white diaper flannel 3 inches by 10 inches for large pads and 3 x 8.5 inches for small pads.
2. Stack 3 pieces of flannel together
3. Serge edges
4. Finished pads should measure 2.75”x9.5” (large) and 2.75”x8” (small)
Envelopes
2. Align both ‘A’ pieces with a ‘B’ piece at either end, between the ‘A’ pieces. The finished edge of ‘B’ goes toward the center.
3. Pin the pieces with right sides together.

4. Starting at point ‘a’, stitch around the whole perimeter of the envelope until point ‘b’, using a ¼” seam. Leave the end between ‘a’ and ‘b’ open.
 5. Carefully clip off corners (TO but not THROUGH the seam) to prevent bulk when the envelope is turned. This allows the envelope to lay flat when turned.
 6. Turn the envelope right side out. Use a long tool (pencil, table knife, etc.) to push the corners out square.
7. Tuck the unstitched end (between ‘a’ and ‘b’) down ¼” and top stitch all the way around the entire perimeter.

8. If you have access to a ‘snap fastener’ tool and know how to use it well, please install snaps as seen in the photo. If not, you may devise another closure (hook and eye, Velcro, ties, safety pin).
Drawstring Bag
2. Cut bag 12”x26” (If fabric frays, serge all 4 sides)
3. Fold both short ends over 1 ¼ “ and sew a straight stitch along the ¼” measurement to make casing.

4. Fold bag, right sides facing in. Back stitch and sew up side seams to cross casing about ¼” over stitching. Lock stitch three times to secure opening.
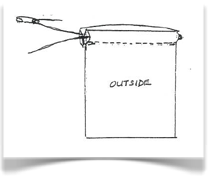
Ties: It is easier to thread ties before turning the bag right side out.
5. Cut 2 ties 26“ long
6. Use a safety pin on one end to thread the first tie, starting at one open end. Tie ends together with a knot. From the opposite side as last time, thread and knot the second tie.
7. You will be able to pull ties from both ends, pulling open and closed easily.
Final Product:


